
Its my daily "take to work bag". My niece uses it as a handy diaper bag for the quick trips. the possibilities are endless with this bag!!! I will give you the general size I use, but it can really be made any size you like.
This is also a great project for fat quarters. You can make this bag out of 2 FQ perfectly! you could mix and match for lining and handles....im telling you its a fun fabric bag.
alrighty....here we go!
Supplies needed:
Corduroy---any color and style 1/2 yard (my fav is the wide wale---its the fat cord stripes)
lining/handle fabric--1/2 yard or 2 FQ
Pellon 987 fusible fleece
thread
sewing machine and a nice hot steamy iron...of course!
CUTTING:
Cut 2 corduroy pieces 14x14 for outside of bag.
Cut 2 lining pieces 14x14 for inside of bag--if using 2 fq cut a 14x14 piece from each fq.
Cut 1 long strip 4"xWOF of lining fabric for inside of handle (you will cut this into 2 later) if using FQ cut a piece from each fq 4"x21.
Cut 1 long strip 5"xWOF of corduroy fabric for outside of handle (you will cut this into 2 later)
(or if using fat quarters for lining cut the corduroy into 2 pieces now of 5"x21")
Cut 2 pieces of the fusible fleece 14x14-you will iron this as directed onto the back of the corduroy.
Note: i make sure that when I am ironing on the corduroy to follow the smooth direction of the corduroy in the same direction with the iron. make sense? if not, please ask and i will try and explain further.
SEWING TOGETHER:
take the corduroy handle piece, fold and sew a 1/4 inch seam with RST. (right side together). be sure and backstitch well at the ends for turning. do not iron this before hand, you will iron after turning.... you'll see why in a few. do the same with the lining handle piece. (see photo)

use any method to turn these "tubes" right side out. NOW we can iron these. put the seam near the middle and iron. this is for both the handle pieces. (see photo below) the seams will be hidden once you sew them together so dont worry if they are crooked after ironing.

place the corduroy handle on the bottom seam side up and the lining fabric on top with the seam side down--so the seams are both touching each other.

sew a straight line down both sides of the fabric to attach these 2 pieces together. your handles are now done!!! (see photo above) (the corduroy can slide around a little, so hold on and adjust during sewing. mine are never perfect!!) the corduroy WILL overlap, that is the fun part of these handles.
after sewing the handles together, cut in half--if using 1 long piece. this will give you 2 handles.(If using 2 fq pieces you will already have sewn the 2 seperately).
Pin each handle 3.5 inches from each side of the outside corduroy pieces. sew them at the top to attach the handles onto the outside of the bag. Be sure and check for a direction of the fabric with the corduroy outer pieces. first make sure the stripes are going up/down. next, if you feel it, it has a smooth direction. i make sure this is the same on front and back and when i brush my hand along it the smooth direction is going down. youll see what i mean when you feel the corduroy fabric!

Take the 2 outer corduroy pieces, pin the 2 pieces RST with handles on top, and sew them together. Only sew along the 2 sides and bottom--leaving the top open.
next, take the 2 lining pieces and sew them together---RST. again the 2 sides and the bottom but you will need to leave a 4-6 inch gap in the middle at the bottom open for turning the bag at the end. be sure to back stitch well at these opening seams.
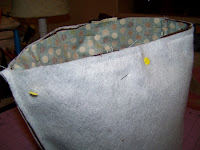
cut a 2 inch square out of each bottom corner of the outside and the lining. pinch together, line up seams and sew. this creates the bottom of the bag. (see photo below)


Make sure the outside corduroy portion of the bag is still inside out. turn the lining and place the lining inside of the bag. the rightside of each fabrics should be touching. now pin well along the top about 1/2 inch down. sew a 1/4 inch seam all the way around. (see photo below)

remove pins and pull the bag through your opening in the lining. (we like to call this the birthing of the bag)
push the lining back into the bag and it should look GREAT!!! now, iron with a nice hot steam along the top. then sew along top to complete the bag!!! pull the lining out and sew your opening closed and WOW your DONE!!!!!


I hope these directions made sense, but not too wordy. but hey, its my first tutorial! winkwink.
10 comments:
very fun tutorial! I absolutely love corduroy fabric. Love the way the handle fabrics overlap with each other!
Wow. I want to make one so bad!
Thank you for the tutorial. I want to make one to use as a diaper bag for my daughter and use the same fabric as I'm using to make her a quilt. It's her first baby and I am so excited about being a grandma!
I can't wait to try this, since you live in Vegas too can I ask where you get all your fabric? Can you get corduroy at Joanns?
MEKA...welcome to my blog!!! i did find the corduroy at joanns, but its seasonal so they are down to almost nothing. another place i found it was denver fabrics at a really good price!!! its also 60 wide, not like reg fabric of 44. have fun making those bags!
ps...thats denver fabrics online.
I am easily confused...what does WOF mean?
WOF is width of fabric...sorry for not putting that in the tutorial.
Great bag, great tutorial, thanks Bobbi.
Now I know what to do with that three yards of teal corduroy stashed away!
Yippie, thanks for the great idea and tutorial.
Post a Comment