Monday, January 25, 2010

Baked Parmesan


have you ever had baked parmesan chips with a salad? WOAH......

i made these tonight and topped my spaghetti with them. yummo....move over rachael ray!

So I thought I would share the simple recipe of making them!! heres what you need.

parchment paper, cookie sheet, parmesan cheese, garlic powder

sprinkle parmesan cheese onto a parchment paper covered pan. sprinkle garlic powder over. bake 350 for 5-10mn or until browning. remove and let cool completely to break into pieces.

thats it....and let me tell you these little buggers are addicting.

Sunday, January 24, 2010

goofy football....


GOOD LUCK VIKINGS!
This is my GOOFY doll....which you can find a tutorial on my sewing buddy HEIDI's blog. even HE is a vikings fan!

Friday, January 22, 2010

FEBRUARY Friday Night Sew-in....date is set!

alright ladies...its time again! mark your calendars for the FRIDAY NIGHT SEW-IN. Feb 19th is the date.

The sign up is on HEIDIs blog.....and we promise to follow our own rules this time. heehee.
we will be doing a giveaway and promise to check and make sure everyone blogs about what they did that fun filled friday night before our drawing!

Joining the Friday Night Sew-in is a way of setting some time aside to work on those projects on your to do list. And remember - it doesn't have to be a sewing project.. maybe you have a knitting project.. or some scrapbooking.. it could be anything!!! what i love is how fun you have all made it.....a yummy dinner, fun snacks, a beverage like hot cocoa.....so keep up the FUN posts! also remember we created a FLICKR account for this special night! so sign up, post a pic, have some fun, chit-chat about it.

head on over to http://www.handmadebyheidi.com/ for the sign up list, a blog button, and the rules. this is really becoming a FUN event for us!!!

see you in feb!

Thursday, January 21, 2010

rainy day project

living in the desert makes you appreciate rain. well, we are getting pounded and i love it. so im going to spend my night in my fav chair, comfy quilt on my lap and work on my siggy blocks.

we might need to send an ark to my sewing buddy in arizona..........can anyone use a saw?

Tuesday, January 19, 2010

potholder pass swap!!!


well, i have joined another swap....am i nuts? maybe....

but these are SO much fun! i love sending someone something ive made. i can only give so many gifts to my family right? i havent made any potholders yet either, so the curiousity got to me....along with my sewing buddy! i love her for her ideas and wouldnt be where i am today without her giving me the little extra push i need.

so now i get to find some CUTE fabrics to do some potholders in.

Sunday, January 17, 2010

Fall Mini Quilt Swap

LOOK WHAT I GOT!!! Its it adorable? a BIG THANK YOU to Ellen from Washington who made it for me....or known as "Grandma made it" on flickr. Im in awe at the time she put into it! I also feel a bit guilty....my pics are below of the mini i made.....

I have a thing for pinwheels right now, so i couldnt wait to do them for the fall swap. But im feeling bad that its too "simple". the colors really are beautiful tho!


this is the back and umm....yeah....my label is a little HIGH up! i put it on, without thinking, before i put it together. live and learn eh? but in the end i know someone will cherish it!

Surprise 2nd winner....Friday Night Sew-In !!!


Due to such a fantastic response to our "Friday Night Sew-in" Heidi and I have decided to add a 2nd surprise winner!!! CONGRATS TO: #16...CRYSTAL! (picked by random.org). crystal if you could email me at blimer08@cox.net for your shipping information i will put in the mail on tuesday due to the monday holiday.
Thanks to you ALL for participating and lets keep this night going! We loved all of your projects! Dont forget we have a flickr account going for sharing our projects. this again is totally optional! I love how much fun you all made it....special foods, drinks, snacks.
We will see you all in february! stay tuned for our date announcement.
Bobbi and Heidi

Saturday, January 16, 2010

Friday Night....FLICKR group!


how exciting is this.....we started a "Friday Night Sew-in" flickr group! thanks to Heidi for doing the leg work!!! You still need to sign up on Heidi's BLOG for the "giveaways", but the flickr group is to post our pics and things we worked on.
Here is what i had going on last night.....my siggy blocks.

BUT after working hard on them last night, i realized something. I dont like the one pattern i got. yes, its true....after cutting out 100 of those puppies, i said ick!
SO, i spent my morning going fab shopping and this is what ive come up with. Thanks to my sewing buddies idea, i found some cute blue prints from the Wild Thyme line. I also got the pink fabrics, but I am not sure yet if ill use it.

Dont forget, if you have a flickr account go to that group, join in, and share your projects.
(its not required).

Thursday, January 14, 2010

the big winners are......

Let me start by thanking all of you for such fabulous comments about my blog and crafts!!!
so lets just get down to the dirty....cuz ive been dying to blog all week but held myself back so this could be my 100th post! WOOHOO

FIRST PRIZE goes to:::::: Dandelion quilts!
Dandelion Quilts said...
Congrats on your nearly 100th post. I really think that bag is cute, thanks for the tutorial. Also, I love the quilt on your banner.


SECOND PRIZE goes to:::::: Deanna
Deanna said...
Yea for a pincushion. I have been needing one and putting off making one and there is no way I would buy one so MAYBE I can be a lucky winner of one.
January 12, 2010 6:55 PM

so ladies please email me at blimer08@cox.net for your mailing information so the items can be shipped directly to your doors!!!


THANK YOU again to all of you and welcome to all of my new followers. yikes, now the pressure is on to keep you coming back!!! happy crafting!

Sunday, January 10, 2010

99th post GIVEAWAY!!!

***giveaway is officially closed. thanks for stopping by.

I decided to do my giveaway on 99....because the winner can be my 100th post (if i dont blog before then).


SOOOO....here are my items I am proud to give away.

First Prize:
The Chocolate Corduroy Bag I made for my tutorial, a Simple Abundance charm pack by Moda and a cute pin cushion made by ME!

Second Prize: A schnibbles pattern and a cute pin cushion made by ME!


Here are the rules:

1. one entry for commenting on this post

2. 2 entries for commenting on this post AND becoming a follower

3. 3 entries for commenting on this post, becoming a follower AND blogging about my giveaway!


I will close the giveaway thursday and do the drawing. GOOD LUCK and thanks for stopping by!!!


Saturday, January 9, 2010

Corduroy bag TUTORIAL

Its my daily "take to work bag". My niece uses it as a handy diaper bag for the quick trips. the possibilities are endless with this bag!!! I will give you the general size I use, but it can really be made any size you like.


This is also a great project for fat quarters. You can make this bag out of 2 FQ perfectly! you could mix and match for lining and handles....im telling you its a fun fabric bag.

alrighty....here we go!
Supplies needed:
Corduroy---any color and style 1/2 yard (my fav is the wide wale---its the fat cord stripes)
lining/handle fabric--1/2 yard or 2 FQ
Pellon 987 fusible fleece
thread
sewing machine and a nice hot steamy iron...of course!


CUTTING:
Cut 2 corduroy pieces 14x14 for outside of bag.

Cut 2 lining pieces 14x14 for inside of bag--if using 2 fq cut a 14x14 piece from each fq.


Cut 1 long strip 4"xWOF of lining fabric for inside of handle (you will cut this into 2 later) if using FQ cut a piece from each fq 4"x21.

Cut 1 long strip 5"xWOF of corduroy fabric for outside of handle (you will cut this into 2 later)
(or if using fat quarters for lining cut the corduroy into 2 pieces now of 5"x21")

Cut 2 pieces of the fusible fleece 14x14-you will iron this as directed onto the back of the corduroy.

Note: i make sure that when I am ironing on the corduroy to follow the smooth direction of the corduroy in the same direction with the iron. make sense? if not, please ask and i will try and explain further.

SEWING TOGETHER:

take the corduroy handle piece, fold and sew a 1/4 inch seam with RST. (right side together). be sure and backstitch well at the ends for turning. do not iron this before hand, you will iron after turning.... you'll see why in a few. do the same with the lining handle piece. (see photo)


use any method to turn these "tubes" right side out. NOW we can iron these. put the seam near the middle and iron. this is for both the handle pieces. (see photo below) the seams will be hidden once you sew them together so dont worry if they are crooked after ironing.


place the corduroy handle on the bottom seam side up and the lining fabric on top with the seam side down--so the seams are both touching each other.


sew a straight line down both sides of the fabric to attach these 2 pieces together. your handles are now done!!! (see photo above) (the corduroy can slide around a little, so hold on and adjust during sewing. mine are never perfect!!) the corduroy WILL overlap, that is the fun part of these handles.

after sewing the handles together, cut in half--if using 1 long piece. this will give you 2 handles.(If using 2 fq pieces you will already have sewn the 2 seperately).

Pin each handle 3.5 inches from each side of the outside corduroy pieces. sew them at the top to attach the handles onto the outside of the bag. Be sure and check for a direction of the fabric with the corduroy outer pieces. first make sure the stripes are going up/down. next, if you feel it, it has a smooth direction. i make sure this is the same on front and back and when i brush my hand along it the smooth direction is going down. youll see what i mean when you feel the corduroy fabric!

Take the 2 outer corduroy pieces, pin the 2 pieces RST with handles on top, and sew them together. Only sew along the 2 sides and bottom--leaving the top open.

next, take the 2 lining pieces and sew them together---RST. again the 2 sides and the bottom but you will need to leave a 4-6 inch gap in the middle at the bottom open for turning the bag at the end. be sure to back stitch well at these opening seams.

cut a 2 inch square out of each bottom corner of the outside and the lining. pinch together, line up seams and sew. this creates the bottom of the bag. (see photo below)


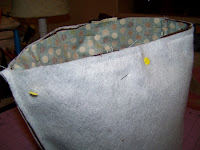
Make sure the outside corduroy portion of the bag is still inside out. turn the lining and place the lining inside of the bag. the rightside of each fabrics should be touching. now pin well along the top about 1/2 inch down. sew a 1/4 inch seam all the way around. (see photo below)


remove pins and pull the bag through your opening in the lining. (we like to call this the birthing of the bag)

push the lining back into the bag and it should look GREAT!!! now, iron with a nice hot steam along the top. then sew along top to complete the bag!!! pull the lining out and sew your opening closed and WOW your DONE!!!!!


I hope these directions made sense, but not too wordy. but hey, its my first tutorial! winkwink.


Friday, January 8, 2010

friday night sew-in reminder....Jan 15th!

WOW.....we have 51 people signed up for our virtual Friday night sew-in! I'm sooo excited!!! for any of you who haven't seen it....go to my sewing buddies blog and sign up! we have a button for your blog and also have give aways too!

So I thought I would give you a little history on how this night was born.

Heidi and I are cousins....and have become great friends through the years. Our grandma, Alice, used to sew and we cherish the fact that we have carried on her legacy. She passed away before I ever discovered this love and obsession for sewing.....but I'm sure she is proud!

My sister, Kristie, made me an adorable bag a few years ago......and that started the sewing craze. Heidi saw it, bought the pattern, and started sewing like a mad woman! then after a few months, she finally talked me into learning how and taught me on a fun weekend we had together in a cabin in flagstaff!!! (yes we drug all of our sewing stuff up to the woods!!) well.....this has led me to quilting which i really do enjoy!

anyhoo... last summer, Heidi and I decided to take a night (which happened to be a friday) and sew "together" via our cell phones. (we live 260 miles apart). We were working on the same project and sharing pictures and ideas all through the night.

once we realized how fun it was....we decided to do it at least every 3-4 weeks. then came the "lets share" idea and VOILA.....the "Friday night sew-in" was born.

so hurry...sign up...don't be late....cuz its next Friday night!!!

Thursday, January 7, 2010

siggy swap !!!


I am SO SO SO excited! i got in on the siggy swap on psiquilt's blog. rachel does such a great job on everything! from her pictures, to her tutorials, to her swaps! i cant wait to do this one! she was only allowing 100 people in due to the nature of the swap......thank goodness my new phone works so good that i surf some of my fav blogs at.... ahem....work....yeah on my breaks.

it also gets me ready for spring. ill go get some fun spring fabs this weekend and start on my blocks.

so a big THANK YOU RACHEL for letting me be a part of this swap! happy spring (ok vegas was 65ish today...i know everyone else is freezing and snowed in but spring is coming...i promise)

Tuesday, January 5, 2010

we have leopard prints!


Leopard or cheetah...heck i can never remember.

This was a fun one to make....wait arent they all? dont forget im going to do a tutorial later in the week on the simple cord bag. not the one above, but my other ones. im also going to post a giveaway at the end because im almost at 100 posts!!!!!!!!

Sunday, January 3, 2010

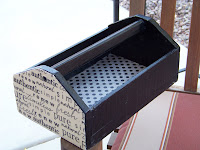
mod podge caddy....with a little authentic flair

the before pic......


the after pic......
how ADORABLE is that??? ive had this old wood tool box for years and its just been loaded down with junk mail. it gave me a good reason to go thru that junk mail AND make myself a caddy. look at the pic below and youll see WHY i needed this. HAHA!!! (yes thats a soup bowl)


i have to give some credit to MOD PODGE ROCKS...i LOVE her site and ideas! also, where would i be without saying i also love the authentic line by sweetwater! Ironically they are both doing giveaways right now too.....so head over to their blogs.


lastly, a few people have asked about the bags that HEIDI and i have made with corduroy. I will be doing a tutorial later this week for that bag. WOOHOO.

Saturday, January 2, 2010

bag addict


here is another bag i made...i put a new spin on it and put a pocket on the outside and wow it totally makes this bag style!!! i could make a new one of these each and every day .... i love these bags!!! one of my many aunts was in town and it was her 68th bday....so i gave her this bag. its a great size for roadtrips and they were heading back to NM. i hope she enjoys it!
My wood/mod podge project is drying (step1 done--spray paint). im patiently combing through oodles and oodles of fabric to decide on just the perfect one to mod podge onto my wood caddy.
with this much fabric....its not an easy task. LOL


Friday, January 1, 2010

mod podge rocks baby!


ive been surfing this blog for awhile, and am going to work on my very own mod podge project this weekend. i cant wait!!! its going to be a cute wood caddy for my sewing space......my 2010 resolution......GET ORGANIZED!
heres a sneak peek of the "before...


so stay tuned....hopefully i will have more pics by sunday!
happy crafting in this wonderful new year! 2010 baby....